How to configure a Router to work as a DHCP Server.


As we know ip addresses can be assigned to a end device in two way.
- Static
- Dynamic
In static way network admin or system admin or user manually assigned ip address on the device, but if the number of devices are much more and you dont want to take the headache for assigning the ip addresses, then it become so teasing and time taking to manually assign ip address to every device. To solve this problem, Dynamic way of ip assigning is used.
DHCP is a protocol that is heavily used to assign IP addresses automatically over LAN networks. If you are interested in understanding how DHCP works, then refer the below blog post.
Read: How DHCP works
The above post will take you through the working of DHCP as well as its configuration in linux system. However similar to most networking devices, a network router can also be configured to act as a DHCP server.
This tutorial will take you through the simple commands required to get it configured on your router.
Step 1: First Configure Ip Address on the Router Fast Ethernet Port:
Router>enable
Router#config terminal
Enter configuration commands, one per line.  End with CNTL/Z.
Router(config)#int fa0/0
Router(config-if)#ip address 192.168.1.1 255.255.255.0
Router(config-if)#no shut
Router(config-if)#exit
Router(config)#ip dhcp pool cisco
Router(dhcp-config)#network 192.168.1.0 255.255.255.0
Router(dhcp-config)#network 192.168.1.0/24Every subnet has its own gateway. It does not matter what the gateway ip address is. But normally people give the first ip address in the subnet as gateway. Let's give the ip 192.168.1.1 as the gateway for our created subnet in DHCP as a gateway. This can be done our our router as shown below.
Router(dhcp-config)#default-router 192.168.1.1
Now apart from the gateway, the client's who gets ip addresses from this address pool, can also be provided with a dns server ip address. This DNS server IP address will be used by the clients for name resolution.
Router(dhcp-config)#dns-server 192.168.1.100
And at last we exit from the poll configuration mode using exit command.
Router(dhcp-config)#exit
Now If you want to block a certain ranges of IP ADDRESS you can use the below command.
Router(config)#ip dhcp excluded-address 192.168.1.4 192.168.1.7
Above command will block ip ranges from 192.168.1.4 to 192.168.1.7 to be used in this network.
Let me show you the Topology Diagram for above configuration.
You can see below the diagram of the above configuration. we have taken a router here and configured it to use as a DHCP Machine.
You can see below three PC connected with the router with the help of switch are getting ip address through router dynamically because we have configured this router to act as a dhcp server now.

Now we can if you are using static routing configuration even you can use any or all of your router as a DHCP server,
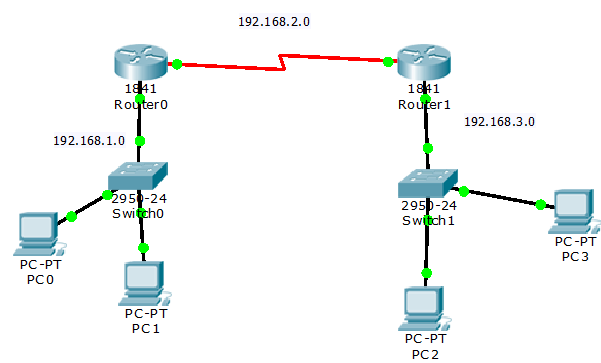
In below Diagram we will see the static routing configuration along with one of it's router configured to act as a DHCP Machine.

Now See Configuration on Router0
Router>enable
Router#config terminal
Enter configuration commands, one per line. End with CNTL/Z.
Router(config)#hostname R1
R1(config)#int fa0/0
R1(config-if)#ip address 192.168.1.1 255.255.255.0
R1(config-if)#no shut
R1(config)#ip dhcp pool cisco
R1(dhcp-config)#network 192.168.1.0 255.255.255.0
R1(dhcp-config)#default-router 192.168.1.1
R1(dhcp-config)#exit
R1(config)#interface se0/0/0
R1(config-if)#ip address 192.168.2.1 255.255.255.0
R1(config-if)#clock rate 64000
R1(config-if)#no shut
Now See the configuration on Router1
Configure both fast ethernet and serial port one by one here on second router.
First we are going to configure serial port of router.
Router>enable
Router#configure terminal
Enter configuration commands, one per line. End with CNTL/Z.
Router(config)#interface se0/0/0
Router(config-if)#ip address 192.168.2.2 255.255.255.0
Router(config-if)#no shutdown
Router(config-if)#exit
Now we will configure fast Ethernet Port of Router
Router(config)#int fa0/0
Router(config-if)#ip address 192.168.3.1 255.255.255.0
Router(config-if)#no shutdown
%LINK-5-CHANGED: Interface FastEthernet0/0, changed state to up
Few commands we need to know if you are working with DHCP SERVER.
#dhcp show
#show ip dhcp bindings
Commands you need to know if you are getting your ip from a DHCP Server.
>ipconfig /renew
>ipconfig/all


 Sarath Pillai
 Satish Tiwary
Comments
dhcp
well explained
Amazing explanation and very useful information
thank u for giving ur best.
Router
good information regarding routers. well done.
Redudant of DHCP Router
HI Team, is it possible to configure DHCP server in two Routers [Rouer A Router B], Incase if any one router fails the second router should take the IP address from Dhcp, is it achievable..
Add new comment