How Does SSL/TLS Chain Certificates and Its Validation work?

The number of websites on the internet that enforces SSL, ie: HTTPS version of their websites are growing day by day, which a good thing as far as security is concerned. This claim is not without any proof. All major web browser statistics published online does indicate this fact. Checkout the chrome staticstics on ssl published by Google, and Firefox statistics from Mozilla.
Most of us know the steps involved in getting an SSL certificate for a website. It is actually a simple process, that involves just two steps. The first step is to provide details about your domain/website to a certificate authority (this is generally called as CSR - Certificate Signing Request). The second step is to prove that you indeed own the domain/website. There are different methods for proving ownership. For example, adding a TXT DNS record (well if you can change a DNS record for a domain, that proves you own that domain), adding an HTML file at a specified location on the domain etc.
Related: How DNS Works?
Related: SSL working Explained
Providing proof of ownership to a certificate authority is really really important. Otherwise just about anybody can request a certificate for any domain/url and get it signed.
Once the certificate authority confirms and is satisfied with the proof you gave, they will provide back a signed certificate. Most of us get confused when they(certificate authority) give back the signed certificate along with some other certificates called "intermediate certificates" (the whole thing is usually referred to as certificate chain). The sole intention of this article is to dive into this certificate chain thing and understand its need.
Let us imagine that we are aspiring to become a certificate authority. Yes, it is a lucrative business, where you can charge for each certificate you sign. We need to plan this out. The best tool at our disposal is openssl, which is available in all Linux distributions.
The very first thing that we need to do is to generate a private key for our CA. We will call this rootca.key (you will get to know why i prepended "ca" with "root" here shortly). This can be done using openssl command as shown below.
openssl genrsa -out rootca.key 4096
4096 is the length of the key in bits ( if you dig a bit more, in mathematical calculation, it is the length of our modulus). Keep this in mind, the bigger the number, more difficult it becomes to find the factors (a foundation on which RSA algorithm for public/private key encryption is based on). 4096 is good enough for most use cases.
Now let us create a certificate for our CA using the private key we created. But before we do that, we need an openssl configuration file, which we can point while triggering the commands. So create a file named "openssl.cnf" with the below contents.
[ req ]
default_bits        = 4096
default_md          = sha384
prompt            = yes
distinguished_name  = req_distinguished_name
x509_extensions     = v3_ca

[ req_distinguished_name ]
countryName                     = Country Name (2 letter code)
stateOrProvinceName             = State or Province Name
localityName                    = Locality Name
0.organizationName              = Organization Name
organizationalUnitName          = Organizational Unit Name
commonName                      = Common Name
emailAddress                    = Email Address
countryName_default             = IN
stateOrProvinceName_default     = TELANGANA
localityName_default            = Hyderabad
0.organizationName_default      = ExampleCA, Inc.
organizationalUnitName_default  = ExampleCA Root
emailAddress_default            = ops@example.com

[ v3_ca ]
subjectKeyIdentifier = hash
authorityKeyIdentifier = keyid:always,issuer
basicConstraints = critical, CA:true
keyUsage = critical, digitalSignature, cRLSign, keyCertSign
In the above configuration file, there are several default values that we have assigned (like country, organization etc. The attributes that ends with _default are default values. This can be overriden while firing the command, but for making it simple, we have assigned several default values).
Now let us create a self signed certificate for our CA. We will be passing the openssl config file as argument to the command. See below.
root@ip-10-12-2-55:~# openssl req -config openssl.cnf -new -x509 -days 3650 -sha384 -extensions v3_ca -key rootca.key -out rootca.crt
You are about to be asked to enter information that will be incorporated
into your certificate request.
What you are about to enter is what is called a Distinguished Name or a DN.
There are quite a few fields but you can leave some blank
For some fields there will be a default value,
If you enter '.', the field will be left blank.
-----
Country Name (2 letter code) [IN]:
State or Province Name [TELANGANA]:
Locality Name [Hyderabad]:
Organization Name [ExampleCA, Inc.]:
Organizational Unit Name [ExampleCA Root]:
Common Name []:ExampleCA Root Certificate Authority
Email Address [ops@example.com]:
x509 is the standard for creating SSL Certificates. The certificate of our ca will be stored inside the file "rootca.crt". This certificate contains the public key as well. Apart from the public key, the certificate will also contain our CA signature (to sign a certificate a private key is used, which is the reason we gave the private key created earlier.). The above command will prompt you to type in several information regarding this certificate, which will also be part of the certificate. This certificate will be valid for 10 years (specified by -days 3650)
In our case we have named our CA as "ExampleCA, Inc", and the name using which our ca certificate will be identified is "ExampleCA Root Certificate Authority".
Remember that this certificate is a self signed certificate(ie: Nobody else is signing it. We are becoming a CA, this is the place where the trust begins, so there is nobody that can sign this :) ).
Did you notice a section called v3_ca inside our openssl.cnf file(which we mentioned as -extensions in the command)?. That is actually an important section. If the parameters in the section has the keyword critical, then it is considered as critical. The parameter basicConstraints lets you specify whether the certificate is a CA certificate or not. The basicConstraints field with CA set to "TRUE" is important for a CA certificate. The next parameter is keyUsage , which is also set to critical by us. This indicates the kind of use cases that the certificate is valid for.
Now we have the two essential items needed for becoming a CA. We have the private key and a certificate for our CA. Using these two, we can now sign SSL certificates for others. We can now ask others to generate a CSR and get a signed certificate from us with a small cost associated (sounds simple right?). Let us imagine that somebody has generated a CSR and is looking forward to get it signed by our new CA.
Let us test our CA by creating the first CSR and sign it before we sign any real customer. To do this, we generate a private key and then CSR for a website called www.example.com. See below.
openssl genrsa -out example.com.key 2048
Although longer key length is considered as secure, 2048 is good enough for an end user (remember that we are creating a new private key for www.example.com. Our CA private key and certificate is already created and will only be used to sign.)
Now let us generate a csr using the key we just created for example.com (ie: example.com.key). See below.
root@ip-10-12-2-55:~# openssl req -new -days 365 -key example.com.key -out example.com.csr
You are about to be asked to enter information that will be incorporated
into your certificate request.
What you are about to enter is what is called a Distinguished Name or a DN.
There are quite a few fields but you can leave some blank
For some fields there will be a default value,
If you enter '.', the field will be left blank.
-----
Country Name (2 letter code) [AU]:IN
State or Province Name (full name) [Some-State]:TELANGANA
Locality Name (eg, city) []:Hyderabad
Organization Name (eg, company) [Internet Widgits Pty Ltd]:Example, Inc.
Organizational Unit Name (eg, section) []:IT
Common Name (e.g. server FQDN or YOUR name) []:www.example.com
Email Address []:ops@example.com
Now we are ready to sign our first imaginary customer (for www.example.com). This can be done by using our CA certificates and keys we have created earlier. Ideally the customer will upload the CSR, and we ask to prove their ownership of www.example.com. As this is our imaginary customer, let us go ahead and sign it.
Signing can be done by the below command.
root@localhost:~# openssl x509 -req -days 365 -in example.com.csr -CA rootca.crt -CAkey rootca.key -set_serial 100 -out example.com.crt
Signature ok
subject=/C=IN/ST=TELANGANA/L=Hyderabad/O=Example, Inc./OU=IT/CN=www.example.com/emailAddress=ops@example.com
Getting CA Private Key
Notice the fact that we have used both rootca.key (our CA key file) and rootca.crt (our CA certificate) to sign the customer CSR. The certificate will be valid for 1 year (-days 365). Now you can try example.com.crt and example.com.key in a standard web server like nginx. Let us do that. Below is the nginx snippet am using to test the newly created certificates.
server {
        listen 443 ssl default_server;
        listen [::]:443 ssl default_server;
        ssl on;
        ssl_certificate    /etc/nginx/example.com.crt;
        ssl_certificate_key /etc/nginx/example.com.key;
        root /var/www/html;
        server_name _;
        location / {
                try_files $uri $uri/ =404;
        }
}
Related: How to Permanently Redirect HTTP to HTTPS in Nginx
The above shown snippet is from the default nginx configs, with just the SSL bits added to it (ie: /etc/nginx/sites-enabled/default).
Do not forget to add an entry in /etc/hosts file of your system, from where you will be accessing this web server (ie: an entry that points www.example.com to the ip address of the nginx web server where we installed the newly signed SSL certificates)
Am going to use safari web browser to access www.example.com and see if our SSL certificate is working. As soon as i access https://www.example.com from safari, i get the below. Irrespective of which browser/operating system you are using, you will surely get the below error.

What does that SSL certificate Error indicate?
This is the main reason why becoming a certificate authority is not that simple. Because safari uses MAC keychain, which contains a predefined set of CA certificates that Apple included as part of their operating system. Our CA certificate that we created earlier, is not known to MAC operating system, which is why safari is showing us that warning.
Even chrome and Firefox will show a similar warning, which indicates the same. So the main hurdle in becoming a trusted Certificate Authority is to get the CA certificate included in all major software's. You have to get your CA certificate included in Apple software's (like MAC os, iOS for iPhones), Windows Operating systems, Firefox browser program, chrome and whatever other client application that people use.
Being said that, most operating systems and applications provide a method to import new root ca certificates. Basically you can import our ca certificate to Apple's keychain, or Microsoft certificate list etc to get rid of the warning that we saw. But that will only prevent the error on your computer. What about everybody else in the world. The only way is to get the certificate included in the software's trust store by application vendor itself(via future updates and releases of their software).
Getting your ca certificate approved and included by software vendors requires you to get audited by well known auditing authorities (like WebTrust.org). See some of the programs offered by software vendors, to get a CA certificate included in their releases, using the links below.
Most of these auditing authorities require you to keep your CA private key very secure. Any system that is connected to network is considered insecure. So the recommendation is to keep the private key of a CA offline in a hardware security module.
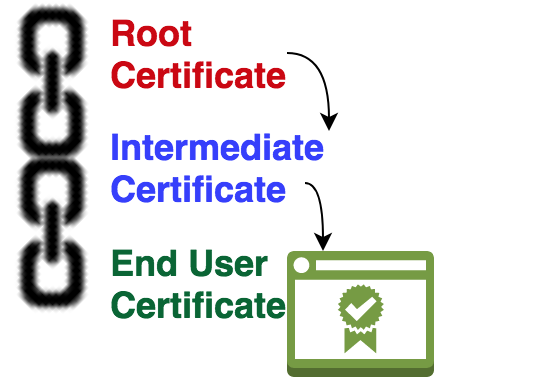
The whole purpose of keeping this CA private key offline is to use it to the bare minimum/or not use it at all (or use something else instead of that). Hence the concept of "Intermediate CA".
The solution is to have an intermediate CA. This intermediate CA will generate a private key and CSR, and get it signed from our first CA. The intermediate CA can then use its own private key and certificate to sign other certificates on behalf of our first CA. This way our first CA's private key can be kept offline, and will not be put to use. We call our first CA as root CA from this point onwards.
Let us go ahead and create an intermediate CA. The process is exactly the same as we saw before(with very slight difference).
The below commands will generate a new private key for our intermediate CA, and a CSR with other details.
openssl genrsa -out intermediateca.key 4096
root@localhost:~# openssl req -new -key intermediateca.key -out intermediateca.csr
You are about to be asked to enter information that will be incorporated
into your certificate request.
What you are about to enter is what is called a Distinguished Name or a DN.
There are quite a few fields but you can leave some blank
For some fields there will be a default value,
If you enter '.', the field will be left blank.
-----
Country Name (2 letter code) [AU]:IN
State or Province Name (full name) [Some-State]:TELANGANA
Locality Name (eg, city) []:Hyderabad
Organization Name (eg, company) [Internet Widgits Pty Ltd]:ExampleCA, Inc.
Organizational Unit Name (eg, section) []:ExampleCA Intermediate
Common Name (e.g. server FQDN or YOUR name) []:ExampleCA Intermediate Certificate Authority
Email Address []:ops@example.com

Please enter the following 'extra' attributes
to be sent with your certificate request
A challenge password []:
An optional company name []:
Unlike our root ca (our first CA), this intermediate CA will not have a self signed certificate. Our root ca will sign this CSR. Let us go ahead and do that.
Before we sign the intermediate CA certificate using the private key of our root ca, we need to modify the openssl.cnf file we created earlier with some attributes that are specific to our intermediate ca certificate. We will add few more sections for our intermediate ca, and then use that section while firing up the sign command. The final openssl.cnf should look like the below (we have added the sections named intermediate_ca, default_settings, ca, and our_policy)
[ req ]
default_bits        = 4096
default_md          = sha384
prompt            = yes
distinguished_name  = req_distinguished_name
x509_extensions     = v3_ca

[ ca ]
default_ca       = default_settings

[ default_settings ]
dir          = /root
private_key       = $dir/rootca.key
certificate       = $dir/rootca.crt
new_certs_dir     = $dir/certs
database          = $dir/index.txt
serial            = $dir/serial
policy            = our_policy

[ our_policy ]
countryName             = match
stateOrProvinceName     = match
organizationName        = optional
organizationalUnitName  = optional
commonName              = supplied
emailAddress            = optional

[ req_distinguished_name ]
countryName                     = Country Name (2 letter code)
stateOrProvinceName             = State or Province Name
localityName                    = Locality Name
0.organizationName              = Organization Name
organizationalUnitName          = Organizational Unit Name
commonName                      = Common Name
emailAddress                    = Email Address
countryName_default             = IN
stateOrProvinceName_default     = TELANGANA
localityName_default            = Hyderabad
0.organizationName_default      = ExampleCA, Inc.
organizationalUnitName_default  = ExampleCA Root
emailAddress_default            = ops@example.com

[ v3_ca ]
subjectKeyIdentifier = hash
authorityKeyIdentifier = keyid:always,issuer
basicConstraints = critical, CA:true
keyUsage = critical, digitalSignature, cRLSign, keyCertSign

[ intermediate_ca ]
subjectKeyIdentifier = hash
authorityKeyIdentifier = keyid:always,issuer
basicConstraints = critical, CA:true, pathlen:0
keyUsage = critical, digitalSignature, cRLSign, keyCertSign
Before we sign intermediate CA certificate using root ca, we should create some directory/file structure we mentioned in the openssl.cnf file above. We just need to create two files and one directory. For this illustration, I am using root user home directory for everything. So let us create them as below.
root@localhost:~# mkdir certs
root@localhost:~# touch index.txt
root@localhost:~# echo 1000 > serial
Now let us sign our intermediate CA by pointing to the new section for extension in openssl.cnf file. This time we will point -extensions option to intermediate_ca section in the openssl.cnf file. The main difference to note here is the pathlen:0 option as part of basicConstraints. This indicates that our intermediate CA certificate cannot be used to to create other CA certificates. It can only be used to sign end entity certificates. Meaning, there should be no CA beneath this intermediate CA.
root@localhost:~# openssl ca -config openssl.cnf -days 2920 -extensions intermediate_ca -md sha384 -in intermediateca.csr -out intermediateca.crt
Using configuration from openssl.cnf
Check that the request matches the signature
Signature ok
The Subject's Distinguished Name is as follows
countryName           :PRINTABLE:'IN'
stateOrProvinceName   :ASN.1 12:'TELANGANA'
localityName          :ASN.1 12:'Hyderabad'
organizationName      :ASN.1 12:'Example, Inc.'
organizationalUnitName:ASN.1 12:'IT'
commonName            :ASN.1 12:'ExampleCA Intermediate CA'
emailAddress          :IA5STRING:'info@example.com'
Certificate is to be certified until Apr 11 13:09:31 2026 GMT (2920 days)
Sign the certificate? [y/n]:y
1 out of 1 certificate requests certified, commit? [y/n]y
Write out database with 1 new entries
Data Base Updated
Now that we have intermediate.crt(created above), and intermediate.key (created earlier), we can sign all upcoming certificates. We can now keep the rootca.key safely offline. Remember only rootca.key will be kept offline. The certificate of our rootca (rootca.crt) will be made public.
Did you notice that our root certificate has 10 years validity and intermediate certificate has 8 years validity. This is essential, because intermediate should always have a validity that is less than the root (Because an intermediate whose root has expired should never be able to sign a certificate).
The certificate authority will generally publish its root certificate and intermediate certificate online. Below are some of the examples of root & intermediate certificates, which are published online.
https://knowledge.symantec.com/support/ssl-certificates-support/index?page=content&id=INFO657
https://search.thawte.com/support/ssl-digital-certificates/index?page=content&id=INFO3805
As mentioned earlier, we can now use the intermediate key and certificate we created, to sign end entity certificates. Meaning, the www.example.com csr can be signed now by using intermediate ca. Let us go ahead and do that. See below.
root@localhost:~# openssl x509 -req -days 365 -in example.com.csr -CA intermediateca.crt -CAkey intermediateca.key -set_serial 1003 -out example.com.crt
Signature ok
subject=/C=IN/ST=TELANGANA/L=Hyderabad/O=Example, Inc./OU=IT/CN=www.example.com/emailAddress=ops@example.com
Getting CA Private Key
To install this example.com.crt certificate, we need to create a chain certificate file. The chain certificate file, as the name indicates provides a complete path for trust verification. Chain certificate file is nothing but a single file which contains all three certificates(end entity certificate, intermediate certificate, and root certificate). This can be done by simply appending one certificate after the other in a single file. The client software can validate the certificate by looking at the chain. Most of the client software's like Firefox, chrome, and operating systems like mac and windows, will only have Root certificates from different authorities installed, it might or might not have intermediate. But a website that shows the full chain, provides the path to reach a Root certificate which the client software already has.
Let us understand how this works. So let us go ahead and create a chain certificate for our example.com.crt. The format is this. A file with example.com.crt as first entry, Intermediate certificate(the CA who signed example.com.crt) as second entry, and the bigdaddy root certificate as the last entry. The below simple cat command will achieve it.
root@localhost:~# cat example.com.crt intermediateca.crt rootca.crt > chain.crt
In the case of the nginx configuration we saw earlier, you can simply modify the file content of "ssl_certificate" directive. In other web servers like apache, you can keep the chain certificate in another directive altogether (in apache its SSLCertificateChainFile).
I have imported our rootca.crt in my Firefox web browser (remember i have imported rootca.crt), and not intermediate certificate. Firefox, similar to other browsers offer you the option to import new certificates. See below.

Once our root certificate is added to trust store, the browser should be able to validate it. See our validated certificate from Firefox, while visiting https://www.example.com

This looks good. But How does the validation actually work on the client side?
1. The "subject" field of a parent certificate should be same as the "issuer" field of the child certificate. For example, the "subject" field of our intermediate certificate should be same as the "issuer" field of our end certificate (ie: www.example.com certificate in our case). See a snapshot from firebox below.

Also checkout the subject field of our root ca certificate, it should be same as issuer field of our intermediate certificate.
2. The certificate should be valid, and not expired, when compared with the current date and time (which you already know, as that is the basic validation component).
3. Policy constraints like keyUsage field that we saw earlier are validated.
4. The pathlen field is also validated to confirm if the number of intermediate certificates are according to the permitted number.
5. Certification revokation status is also verified using CRL (which i have not included as part of our openssl configuration, as that requires a dedicated blog post of its own).
There can be multiple intermediate certificate authorities in the chain (although as an example, we have only shown one here). But at the end of the day, the validation will also check the pathlen field in the certificate.
 Sarath Pillai
 Satish Tiwary
Comments
Nice Article
Very nice and verbosed article. You explained it with ease. This link is going in my Bookmark :)
Keep it up.
Thank you.
Thank you.
It helped me in industry very
It helped me in industry very much. thank buddy for the stuff. slashroot.in in my bookmark list since for long time and visit most of time when I get a time.
Isuru-SRI LANKA
Well explained article.. can
Well explained article.. can you please also explain in detail what actually happens when you sign a certificate?
Add new comment