data and partition recovery using testdisk


Let us try to understand how data recovery possible in any machine?
So what happens when you delete a file in Linux or any operating system out there?
When a file gets deleted the operating system never removes the data from the hard disk, it just removes the link to access that file, and keep that space as unused.But still the data of your file is there in that exact location where it was.
In Linx you can say that its inode, and reference to the filename is deleted(read my post on inode and file deletion) but the data is still there.
Now there is one more point that needs to be understood very clearly here.
The data will remain intact in the same exact location in hard disk even after deleting it, untill something else is overwritten there. Which means the earlier you try to recover the deleted file, there is a good chance of getting that recovered in its entirety.
This is the reason why tools like shred overwrites each file location, by junk data number of times, so as that data becomes impossible to recover.
There are a lot number of tools out there in the market which are free and very powerful in the job that they do, to recover data. I will mention some of them below. the algorithms these tools use to recover the data, are beyond the scope of this blog post to explain it here.
1.DataRescue DD 1.0
2.DiskDigger 0.8.3.176
3.DiskGenius 3.2
4.Partition Find and Mount 2.31(used for recovering lost partition)
5.PartitionRecovery 1.0
6.PhotoRec 6.13b
7.Restoration 3.2.13
8.TestDisk
9.SoftPerfect File Recovery
Most of the tools mentioned above are available as free for use.
So lets get into our topic ie testdisk. We have used linux machine for this tutorial(the same steps are to be followed in windows after downloading the testdisk tool for windows)
How to install testdisk in linux?
so inorder to install testdisk in linux, you need to have rpmforge yum repo enabled. You can also download the rpm from pkgs.org or sites like that and install it with rpm command, but it will be a tedius method as dependancy issues may arise.
So enable rpm forge repo from the below url.
So now you can do just an yum install as below.
[root@myvm1 ~]# yum install testdisk
now open testdisk by just typing the command testdisk from console and you will be presented with a menu as below.

the above menu only asks whether you need logging for whatever you do in testdisk? its better to select the default option as it will create the log file and start logging. And you will be able to see the logfile named "testdisk.log" after you are done with your recovery.
then you will be presented with the all the hardisks you currently have in the machine. Like in my case i have only one /dev/sda as its a vm, and i alloted only 26gb for that vm.
![]()
select the hard disk where you want to run test disk and recover files/partitions.
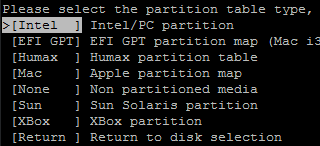
Then you will be presented with a list of parition tables, there you need to select the type of partition table your disk is having. Most of the times the first "Intel option is appropriate". Also select the first option if you are not sure about the kind of partition table you have.
from the above options available in the tool, select the first option if you want to recover lost partions and files, this option can also be used to analyze the partition table and fix the corrupted partition table in the disk.
The second option is little advanced, here you can list and copy all files, create an image of a partition and have a look at the super block of the filesystm.
the third option is for experienced users and select this option only if you really knows what you are doing. inside this option you can change the disk geometry like in cylinder,head and sectors.
the fifth option will write testdisk MBR code to the mbr of the hardisk, this is especially useful when ur hardisk is unable to boot from any of the partitions available, on executing the above option you will be overwriting testdisk mbr. Upon booting the machine will present you with tesdisk mbr,you can use 1,2,3,4 keys on the keyboard to try to boot from all the 4 backup partition tables.
the second last option will delete all the current partition table information from the disk.
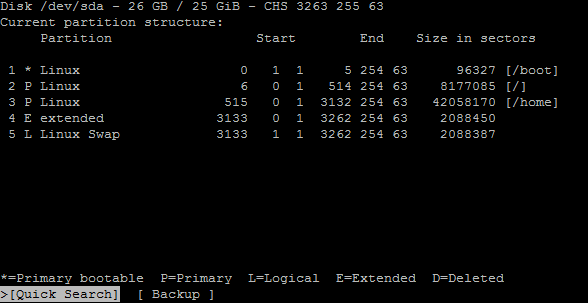
Now lets go ahead with our first "Analyze" option for recovering lost partitions and files.this "Analyze" option will list all current partitions and will give you an option for "quick search" for lost partitions. selecting that option as shown below will ask testdisk to search for lost partitions in the disk, and if found show me that partition.
after the deep search, you will be presented with all the lost partition that testdisk found. you can use the "P" key to print all the files inside that partition and copy files to the current directory if you want. And also you can select the "Write" option if you want that partition back on the disk.
 Sarath Pillai
 Satish Tiwary
Add new comment