SSL OpenVPN in Linux: Installation and configuration


Virtual Private Network is a norm these days in any architecture, where you enable access to your internal network to authorized employees and other associates. In this tutorial we will be discussing the working and configuration of one such VPN solution.
Before getting inside the installation and configuration part we will discuss the basics of this technology. Wikipedia defines openvpn as follows.
A virtual private network (VPN) extends a private network across a public network, such as the Internet.
The definition is quite self explanatory. With VPN in place, you can access an internal network (For example your office private network.) from a remote location using an insecure medium such as internet, and the end result is same as if you were inside the office private network.
Why is this required at the first place? Its because you have several components inside your office private network that can only be accessed by your office internal employees. Of course you don't need to enable access to those components to an outsider (because that poses a security risk. Also because it is irrelevant to enable access to components that only needs to be internal.). But you need to have something in place that will enable access to those components even from an outside public network using a secure medium of communication.
Using VPN, a person(imagine that person to be one of your trusted employee) from a remote network can become part of your internal network, and can do the things as if he is physically part of the office internal network. Some of the use cases of VPN are mentioned below.
VPN enables access to a private network from a distant remote location, using internet as a medium.
Another famous use case of VPN is to interconnect remote office networks together.
Also VPN can be used to hide one's identity. In other words people who wants to access something anonymously without revealing his identity on the internet.
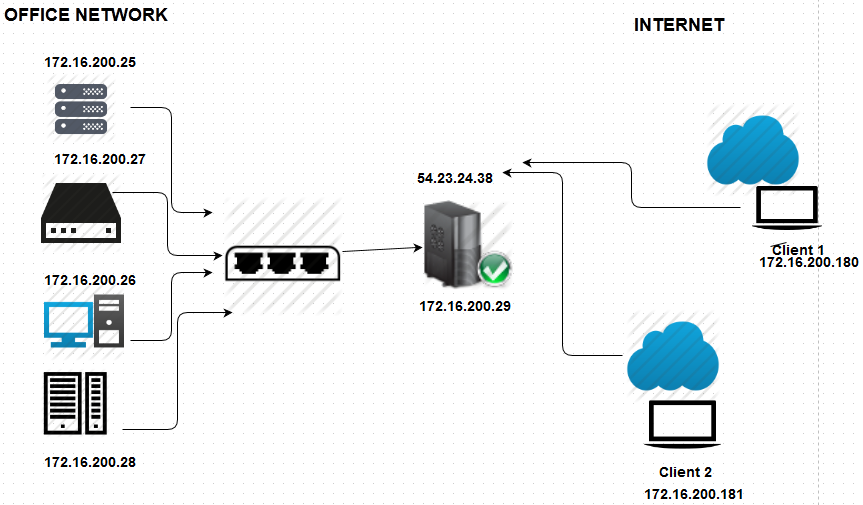
Imagine that one of your system administrator is traveling and he is currently in France. Another system administrator is in India. Both of them needs to access the company internal resources while traveling. Suppose that the client 1 and client 2 shown in the above diagram represents those two system administrators, then they can gain access to the office network using the VPN server (represented by 54.23.24.38 in the above diagram.)
To enable access to office internal network there are couple of challenges and security concerns that we need to discuss. They are mentioned below.
- The first challenge is our VPN server should be sure that the clients are the one's who are authorized to login.
- The second challenge is the clients (the system administrator's from the remote location in the above scenario), needs to confirm that the server is in fact the correct server and is not somebody else.
- The third challenge is the communication between the client's and vpn server must be encrypted and other people(say for example ISP's), must not be able to read the data sent and received.
Another networking challenge is that the client's must be able to access office internal network components. Components which only has a private IP address. In other words once the clients (our system administrators in this case) are connected and authenticated to our VPN server, they must become part of the office network (much similar to as if the clients are physically located inside the office network). This is the reason the clients (client 1 and client 2 in the above shown diagram), are shown as having private IP address range similar to the office network range (172.16.200.180 and 172.16.200.181) even though located at a remote location.
The main idea behind VPN is to make clients who are authenticated part of the internal network. Or say once authenticated, clients are assigned with an additional IP address of private range. This is something like running a very long cable to make a remote client part of the internal network. But the cable is a virtual one which is running through the internet.
Please don't confuse this setup with an IPSec site to site VPN. IPSec is a network layer encryption where two remote networks are interconnected through the internet. SSL VPN is an application layer encryption implementation. Even SSL VPN can be used to interconnect remote networks but we will not be discussing that part in this tutorial. If you are interested in IPSec, then i would recommend to read the below post.
Read: How to interconnected two remote networks using IPSec tunnel
As i said before we have a couple of challenges to overcome for a good VPN implementation. The first set is related to the security part and the second set is related to networking part. We will discuss these things and then get inside the configuration part. Let's begin with discussing the security part first and then see the networking part and then the configuration part.
Why is SSL VPN secure?
The answer to that question is in the question itself. Its because we are using SSL. SSL is the most trusted encryption technology where the client and the server is authenticated.
We use SSL when we access our Gmail accounts, our social networking accounts etc. But the major difference between that SSL implementation and the SSL we will be using with VPN is that...
Public HTTPS ( SSL ) normally do not authenticate clients. Because these service provider's for example Gmail want's their service to be publicly available. Clients needs to be double check and make sure that the server is the original Gmail server they want to access (hence only server authentication.). But the server does not verify the client, or say the clients are not the trusted ones authorized by Gmail. Why is that, because they want to provide their service to general public. In more technical terms certificates are only for server's and not clients.
There is a concept of CA or call it Certificate authority. This certificate authority is the one who guarantees that the server is the original one that you want to access. Certificate authorities sign the certificates and the signatures of almost all certificate authorities are already in-built inside the browser program. Hence when you access any HTTPS website the certificate send by the server is verified with the CA signature to confirm that its signed by the trusted CA.
There is a mechanism in SSL protocol to authenticate both the server and the client to use certificates(which is normally not used in normal SSL implementation). Here the client and the server certificates, both needs to be signed by the same CA (hence when the request to connect to VPN hits the server the server can verify that the client is having the correct certificate and the client can also verify that the server has the correct certificate. Because both were signed by the same CA.). This method of authentication is called as Two Way SSL authentication
SSL is not completely secure in the current form of its implementation. This is because there is one weak point called server private key. Which means if somebody get's hold of that in the future, he can decrypt all the data transferred in the present and also in the past (if he has stored all the traffic.). There is something called as Perfect Forward Secrecy to avoid this.
I will recommend reading the below two posts to understand SSL working and what is perfect forward secrecy.
Read: How SSL(Secure Socket Layer) Works
Read: Forward Secrecy and SSL
Now let's make changes in networking part on our VPN server so that it becomes ready to act as a gateway as well as VPN server for the clients. After this we will see SSL and VPN configuration part.
Let's take the same example VPN server shown in the diagram, with two ip addresses assigned to it. One is a private IP address and the other is a public ip address.
This VPN server is assumed to be the gateway server for all private network hosts. In other words all private network hosts will have a default route to this gateway server. Ex: If the ip address of the gateway VPN server is 172.16.200.29 then all other hosts inside that network will be having a route of 0.0.0.0 to 172.16.200.29,
The first step is to make our VPN gateway server to act as a router for all other hosts in the network. This can be done by first enabling ip forwarding on the vpn gateway server and then adding relevant masquerading rule.
Ip forwarding in Linux is enabled using sysctl parameter. This can be done by the below command.
sysctl -w net.ipv4.ip_forward=1
Related: TCP tuning with Sysctl in Linux
Or you can alternatively enable ip forwarding on the fly by using the below command.
echo 1 > /proc/sys/net/ipv4/ip_forward
But we want to make this permanent, to do that we need to edit sysctl configuration file. After editing the file, the file should have the below shown parameter.
net.ipv4.ip_forward = 1
To enable to the changes, we need run the below command.
sysctl -p /etc/sysctl.conf
IP forwarding is nothing but a mechanism used in the operating system, that forwards those IP packets if the destination address is not its own. This means, after enabling ip forwarding on our gateway server, if a packet reaches our gateway server with a destination address which is different from its own IP address, that packet will be forwarded.
Now forwarding packets is fine. But we need do a NAT before the packet is forwarded. NAT means network address translation. If you are new to NAT, read the below article to understand more..
Read: What is NAT (Network Address Translation)
Now the next step is to configure NAT rules with the help of iptable rules. This can be done by adding the following rule.
iptables -t nat -A POSTROUTING -s 172.16.200.0/24 -j MASQUERADE
Previously by enabling ip forwarding we have asked our Linux machine to forward all packets with a destination which is different from its own ip address. The above shown iptable rule will modify those packets that will be forwarded after modifying the source address to its own. In other words, if one of the private subnet host want to access google.com the packet will first reach the gateway server (because all private subnet hosts has a default route pointing to this gateway server), and once the packet reaches the gateway VPN server it will check its destination address. On finding the destination to be google.com it will decide to forward that packet.
Now before forwarding our gateway vpn server will modify that packet and make its source address as its own ip address. So this means google.com will know that the request is coming from our gateway server. It will not know that the request was originated from another private host.
If there is another subnet say for example 172.16.202.0/24 which is also using this VPN server as its gateway then you need to add another masquerade rule for that subnet as well. If the VPN clients are having another subnet range then that also needs to be added to masquerade.
iptables -t nat -A POSTROUTING -s 172.16.202.0/24 -j MASQUERADE
Now our VPN gateway server is ready as far as routing and forwarding part is concerned. Now our next step is to go ahead and install openvpn package on it.
How to install openvpn package in Linux?
Installing openvpn package is only a single apt-get or yum command away, depending upon the distribution you have. If you are running an Ubuntu server, then you can directly go ahead and run the below command to install openvpn.
#apt-get update
#apt-get install openvpn
For centos users, the method is the same, but you need to have EPEL yum repository package installed first. EPEL can be installed, by the below commands. The first command will download the EPEL yum package and second will install it on the system.
#wget http://dl.fedoraproject.org/pub/epel/6/i386/epel-release-6-8.noarch.rpm
#rpm -ivh epel-release-6-8.noarch.rpm
Now the next step is to install openvpn package from EPEL repository using yum command.
#yum install openvpn
Now once you have installed openvpn package, it by default ships with some example configuration files and some example certificate generation scripts. Openvpn server requires a configuration file called server.conf. This file must be located at /etc/openvpn. However, if you see the /etc/openvpn directory after a fresh installation, you wont find the server.conf file.
So what we need to do is to copy one of the example configuration files that were installed by default to the correct location of /etc/openvpn.
On almost all distributions the default location, where packages install documentation and other example configuration files is /usr/share/doc
So there must be one directory for example configuration inside /usr/share/doc that will hold openvpn related stuff.
If you are running an Ubuntu server, then the sample configuration file location is shown below(its a compressed configuration file. We will first copy that to /etc/openvpn and then uncompresse it )
cp /usr/share/doc/openvpn/examples/sample-config-files/server.conf.gz /etc/openvpn/
root@workstation:/etc/openvpn# gzip -d server.conf.gz
Now we have a openvpn server.conf file. We just need to modify it to our requirement. Now there are three configuration part's that we need primarily modify inside the server.conf file we just copied. Those three configuration part is discussed below one by one.
Routes for the clients who get connected to our openvpn server.
Once the client is authenticated (don't worry we will come to authentication part in some time.), the client needs to have some route configuration. This depends of your specific use case.
Openvpn server has got the capability to modify routes on the clients who gets authenticated and connected. The routes can be something like all traffic through the VPN tunnel or only several subnets through the openvpn tunnel.
Generally what people do is to push default route to the clients. That means once the client is connected to the vpn, even if he wants to access google.com or any other host on the internet, it will all flow through our VPN server. However this is easy to configure and avoid the confusion, i generally don't recommend doing this.
push "redirect-gateway def1 bypass-dhcp
The above shown argument inside the server.conf file is by default commented out. The comment above that argument in the file describes it. The comment is so perfect in describing what it does. You can see the comment below(which i copied from the server.conf file.).
If enabled, this directive will configure all clients to redirect their default network gateway through the VPN, causing all IP traffic such as web browsing and DNS lookups to go through the VPN (The OpenVPN server machine may need to NAT or bridge the TUN/TAP interface to the internet in order for this to work properly).
So if you enable it, clients will be sending all traffic through our openvpn server. I generally don't do this. Because i don't want my openvpn server's bandwidth to be utilized by the clients getting connected for general web browsing and other stuff. I only want my openvpn tunnel to be used to reach those internal private subnets i require.
To do that, we need to add routes to only those specific subnets. This can be done by adding the following thing in the server.conf configuration file.
push "route 172.16.200.0 255.255.255.0"
push "route 172.16.202.0 255.255.255.0"
Adding the above option will enable the clients getting connected to openvpn server to reach only those two subnets 172.16.200.0/24 and 172.16.202.0/24. Replace it with your required subnets.
2. DNS server configuration for clients getting connected to openvpn server
If you want your clients to access your internal subnet's with host names. Then you need to push the internal DNS server IP address also(Provided your internal DNS server is a recursive DNS server ).
Related: How DNS Works
Related: Different between iterative and recursive DNS server
push "dhcp-option DNS 172.16.200.230"
push "dhcp-option DNS 8.8.8.8"
Adding the above option will push two DNS server IP addresses to the clients. The first one is our local private DNS server (which will help clients to resolve local private host names.). And the second one is the Google's publicly available DNS server.
Important Note: If you are pushing default route (by enabling the previously seen push "redirect-gateway def1 bypass-dhcp" option. Then its better to push Google's public DNS server to the clients. This is because, the clients will not be able to resolve host names although connected to openvpn because clients will still be using its own internal private DNS server IP (which mostly will be another private IP of the client's ISP.).And that private IP will not be reachable through the VPN.)
Also don't forget to modify the user and group option to a lower privileged user like "nobody". This can done by un-commenting the below shown option in server.conf file.
;user nobody
;group nogroup
3. IP subnets for openvpn clients to draw IP address from.
server 10.8.0.0 255.255.255.0
The above shown parameter inside the openvpn server.conf file specifies subnets for openvpn clients. This will be subnet from which openvpn clients will get IP addresses once they are connected.
This can be any range of your wish. The only thing that we need to make sure is to masquerade this subnet inside the openvpn server with iptable masquerade rule we have seen previously.
Keys and SSL certificates for OpenVPN server
Now as we have our routing and DNS part ready inside the server.conf file. We need to now generate SSL keys for server. This is done by using openssl package. But as we have seen the sample configuration files placed inside /usr/share/doc. we also have some sample scripts that comes along with openvpn package.
The scripts that comes along with openvpn package is called as easy-rsa. This scripts will allow us to generate the following things.
- SSL server Key
- SSL client Key
- SSL Server Certificate
- Our own Private Certificate Authority
- CA certificate
- DH (Diffie hellman parameters).
Note: I believe you have already gone through the perfect forward secrecy in SSL to know what is Diffie hellman parameters in SSL.
Let's first copy the example scripts called easy-rsa to our /etc/openvpn directory. If you are using ubuntu server, then the easy-rsa example scripts can be found at the following location.
/usr/share/doc/openvpn/examples/easy-rsa
For red hat and centos users the easy-rsa scripts is located at the below location.
/usr/share/openvpn/easy-rsa/
Now let's copy easy-rsa files to /etc/openvpn directory.
cp -r /usr/share/doc/openvpn/examples/easy-rsa/2.0/ /etc/openvpn/easy-rsa
Note: Some latest distribution package does not ship easy-rsa package along with openvpn. In that case, you need to download easy-rsa separately and place it inside /etc/openvpn. easy-rsa can be found from the below github link.
https://github.com/OpenVPN/easy-rsa
We need to now modify some default parameter's that will be used while creating server and client key files using easy-rsa. This can be done by modifying the below file (which we copied from /usr/share/doc/openvpn/examples/easy-rsa/2.0/)
/etc/openvpn/easy-rsa/vars
Scroll towards the end of the vars file, and you will find some parameters like the one's shown below.
export KEY_COUNTRY="US"
export KEY_PROVINCE="CAL"
export KEY_CITY="LA"
export KEY_ORG="Example.com"

export KEY_EMAIL="admin@example.com"
export KEY_CN=vpn.example.com
export KEY_NAME=server
export KEY_OU=sysad
Modify the above parameter's to the ones that your environment suits. Now save the file and exit. These are default parameter's that you can always override while running the script to generate key files.
Now let's go ahead and run the scripts to gererate different key files.
Before running the scripts we need to first rename the file openssl-1.0.0.conf to openssl.conf. This can be done by the following command.
root@workstation:/etc/openvpn/easy-rsa# cp /etc/openvpn/easy-rsa/openssl-1.0.0.cnf /etc/openvpn/easy-rsa/openssl.cnf
Now the next step is to get inside the easy-rsa directory inside /etc/openvpn and run the below commands.
cd /etc/openvpn/easy-rsa
source ./vars
./build-ca
The first source command will ask the scripts take parameters from vars file. The second command will create a CA(Certificate authority) for us. Press "Enter" for all the questions asked (provided you have provided the required default parameters while we edited the vars file previosly.)
Now you will have a folder named "keys" inside the /etc/openvpn/easy-rsa directory. This folder will contain all the keys that you will create using the easy-rsa scripts (as we have created the CA using build-ca command, you will be able to see ca.crt and ca.key files inside /etc/openvpn/easy-rsa/keys directory).
Now the next step is to create SSL key for our VPN server. This can be done by running the below script inside the /etc/openvpn/easy-rsa/ directory.
root@workstation:/etc/openvpn/easy-rsa# ./build-key-server server
As did before press "Enter" for all questions provided you have configured vars file with the correct parameters. At the end of the above script, you will be asked to sign the certificate. Press yes to sign it and commit it.
Certificate is to be certified until Dec  7 03:03:26 2023 GMT (3650 days)
Sign the certificate? [y/n]:y


1 out of 1 certificate requests certified, commit? [y/n]y
Write out database with 1 new entries
Data Base Updated
Now if you go inside the keys folder, you will be able to see two more new key files. server.key and server.crt. One is the private key for the server and other is the server certificate signed by our CA.
The next thing to do is to create diffie hellman parameters. This can be done by running the below command inside the /etc/openvpn/easy-rsa/ directory.
./build-dh
This will once again create another file called dh1024.pem inside keys folder.
Even though all of our certificate and key files are currently located inside /etc/openvpn/easy-rsa/keys/ folder, we need to copy all of them to /etc/openvpn/. This is because the openvpn server.conf file already contains these parameters which will look the keys and certificate files inside /etc/openvpn. You can find these parameters inside the server.conf file (it looks something like the one shown below.)
ca ca.crt
cert server.crt
key server.key  # This file should be kept secret
# Diffie hellman parameters.
# Generate your own with:
#   openssl dhparam -out dh1024.pem 1024
# Substitute 2048 for 1024 if you are using
# 2048 bit keys.
dh dh1024.pem
So let's copy all those files we created using the scripts to /etc/openvpn/ directory as shown below.
cd /etc/openvpn/easy-rsa/keys
cp dh1024.pem ca.crt server.crt server.key /etc/openvpn
Now we have all required SSL details and other configuration options for our openvpn server. The next step is to start openvpn server by the following command.
/etc/init.d/openvpn start
Although we have configured all required details for our openvpn server. we now need to create SSL keys and Certificates for our clients. So let's say we have two clients or say two system administrators, hence let's create certificates and keys for them. What i normally do is to create certificates and keys files with that particular administrators name.
To do that, get inside the /etc/openvpn/easy-rsa/ directory and run the below command.
./build-key client
Replace "client" with your system administrator or associates name or whatever you want to identify who is using this key. You will find the files client.crt and client.key inside the keys folder as before.
Create as many client keys and certificates using a unique name to identify them by using the same above command. Note the fact that one key and certificate can only be used by one client at a time. In other words if you connect to the openvpn server using the same key which is currently used by somebody else and is connected, then you will face connection drop and time outs. So the fact of the matter is to have unique key for each client.
Each client must be provided with the following key and certificate files to successfully authenticate and get connected.
- ca.crt (Ca Certificate file. This is common for all clients as well as the server)
- client.crt (certificate for the client signed by our CA. This of course will be different for all clients.)
- client.key (private key file for the client. This will also be different for all clients)
Please note the fact that i have used client.crt and client.key as an example. You will have files with whatever name used while creating client keys.
Now our openvpn server is ready with its server SSL keys. Now we need to configure our client.
Configuring openvpn Client in Windows
The first step is to download the openvpn client for windows. You can find the openvpn packages for different operating system from the below official openvpn link.
Download openvpn Client package
Download and install the openvpn client for windows. Open the openvpn client and you will have a feature called "connection profile", with an import option to import configuration files.
We need 4 files for each clients. The three files we already discussed (client.key, client.crt, ca.crt). The fourth file is the configuration file for the client. This configuration file looks like the one shown below.
Please note the fact that this file needs to have an extension of .ovpn
client
dev tap0
proto udp
remote xx.xx.xx.xx 1194
resolv-retry infinite
nobind
persist-key
persist-tun
comp-lzo
verb 3
ca ca.crt
cert client.crt
key client.key
route-method exe
route-delay 2
Note: Replace xx.xx.xx.xx with the public IP of our openvpn server. And also replace client.crt, client.key with the proper client key files copied from the server.
A good method to get this done is to provide all clients with their respective ovpn files (because all of them will have different crt and key files) along with their key and certificate files using a secure method like scp.
The above shown file can be named anything, but the extension must be ovpn. And you need to place the ca.crt, client.crt, client.key in the same directory where this ovpn file is.
This ovpn file we created needs to be imported as a profile in windows openvpn client. Once successfully imported. you can simply click on the profile to get connected. If all goes well you should now get connected.
If you are successfully connected you must be able to see one extra IP address on the machine(confirm this by ipconfig command), which will be one from the client subnet range we mentioned inside our server.conf file in openvpn server.
Now try to ping internal hosts that are behind the openvpn server to confirm its working fine.
Configure openvpn client in Linux
This is quite simple. We just need to install openvpn package. And then run the below command.
openvpn --config client.ovpn
Please remember the fact that client.key, client.crt and ca.crt must be present in the same directory where you client.ovpn is located. This is because we have current directory as the location for these files inside our ovpn file.
Some important points to note
- Don't forget to masquerade all subnets that needs to be reachable through the openvpn server(Including the openvpn client subnets).
- Create seperate keys and certificates for all the clients. Although two clients can simultaneously log inside openvpn using the same key, it will cause connection drops and time outs.
- Don't forget to save all iptable rules and make it permanent.
- If you are pushing default route to openvpn clients, then dont forget to push the correct internet DNS server ip address.
- Run openvpn client software in windows with administrator permission.
- Easy-rsa is a simple tool that makes our job of creating certificates and keys files simple. This can also be done by manual openssl commands. I have not discussed that simply because openssl requires special attention and will be posting an article on openssl soon.
- Don't forget to white list UDP port 1194 on openvpn server to allow incoming connections.
- You can switch openvpn server to use TCP instead of UDP by modifying serever.conf file. In that case you need to make changes to your client ovpn file to use TCP instead of UDP
I hope this article was helpful in understanding SSL openvpn and its configuration. If you face problems in getting this configured, please let me know through comments.
 Sarath Pillai
 Satish Tiwary
Add new comment