How to Setup and Configure Chef Workstation

You can consider Chef workstation as a place where all the development work of chef happens. This is the place where most of the administrators will start working on creating cookbooks and recipes. The workstation contains a local chef repository. This repository can then be synchronized with the central chef server.
Chef workstation also will have a command line utility called "Knife", which will be used to interact with the central chef server.
If you are new to chef and its working..I would recommend reading the below article first.
Read: A beginners guide to Chef Configuration Management
This article is the continuation of the previous article in this tutorial series. You can access the previous article, which walks through the steps for installing and configuring Chef server using the below Link.
Read: Installing And Configuring Chef Server
Above article is a prerequisite for continuing with this article.
Chef workstation consists of two primary components as mentioned earlier.
- Chef Repository
- Knife Utility
Let's first install Knife utility on our chef workstation. Knife utility and chef client can be installed easily on the workstation by simply firing up the below curl command. The below curl command downloads a bash shell script provided by chef, and then executes it.
curl -L https://omnitruck.chef.io/install.sh | sudo bash
Successful completion of the above command will look like the below..
Installing chef
installing with dpkg...
Selecting previously unselected package chef.
(Reading database ... 51193 files and directories currently installed.)
Preparing to unpack .../chef_12.11.18-1_amd64.deb ...
Unpacking chef (12.11.18-1) ...
Setting up chef (12.11.18-1) ...
Thank you for installing Chef!
Alternatively you can also do the following steps to install chef workstation specific components.
Step 1: Chef officially provides a debian and rpm package called chefdk. chefdk stands for chef development kit. You can download your operating system specific package by navigating to the below URL.
Step 2: Second step is download it to your workstation server by simply copying the URL specified in the download page and then pass it as a parameter to wget command.
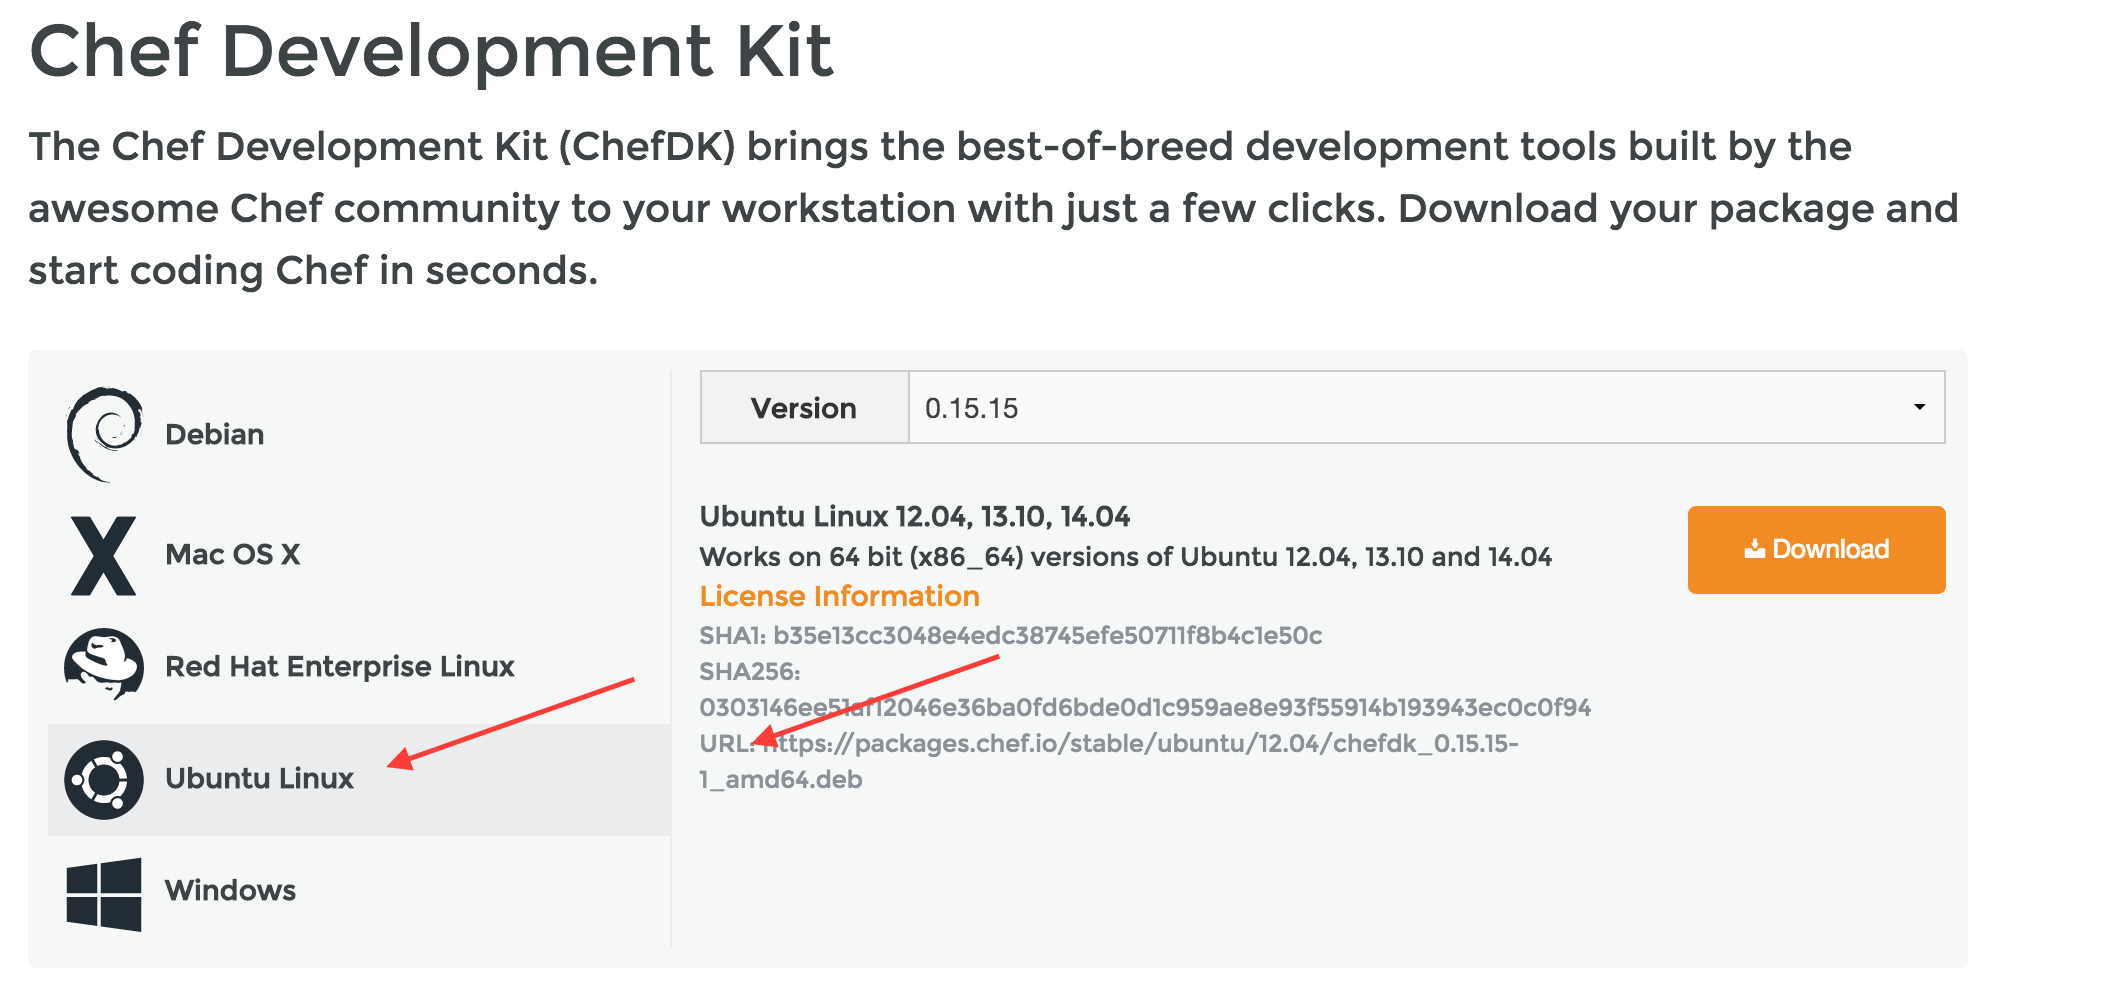
For Ubuntu, you will be doing something like the below..
wget https://packages.chef.io/stable/ubuntu/12.04/chefdk_0.15.15-1_amd64.deb
dpkg -i chefdk*
In the case of RedHat, you should be doing the below..
wget https://packages.chef.io/stable/el/6/chefdk-0.15.15-1.el6.x86_64.rpm
rpm -ivh chefdk*
Once chef server is installed and you have created an organization using the chef manage web interface(as discussed in the above mentioned article), you can login and download the chef starter kit..
What does Chef Starter kit offer?
Chef starter kit is nothing but an archive that contains the directory structure for doing development work on chef workstation. It contains the cookbook and knife settings.
You can simply download it and copy the archive to your chef workstation server. The below image shows the download page for chef starter kit from chef server manage user interface (which we have already installed during our previous tutorial)
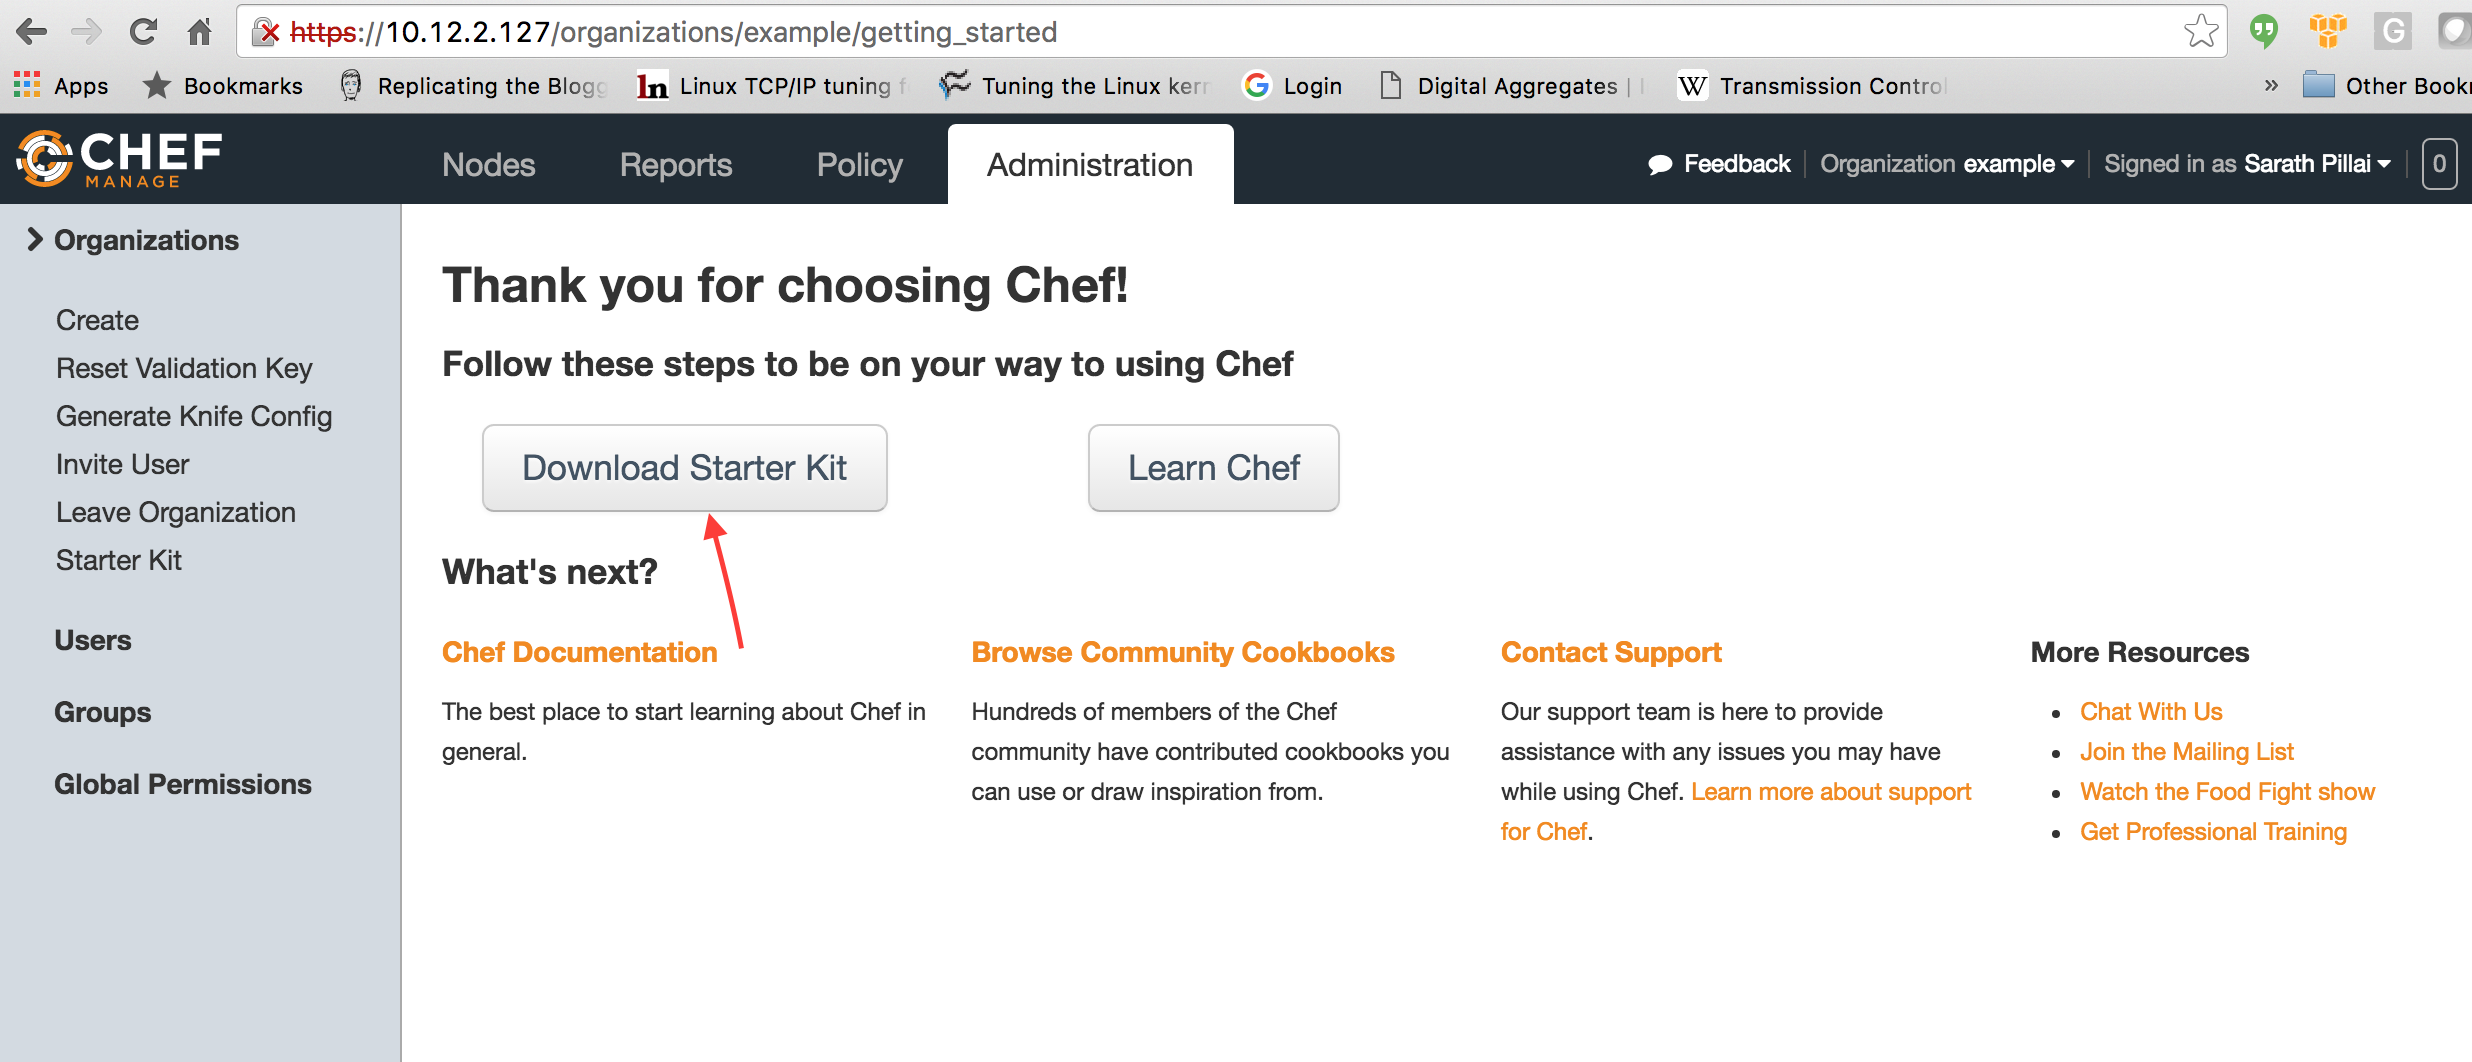
When you click on the download button above, you will be shown a message with regard to resetting of the user keys. Proceed with it. This new key will be part of the starter kit that we are downloading now.
Once downloaded(chef-starter.zip), copy it down to the chef workstation server. Once copied, you can then decompress it as shown below.
unzip chef-starter.zip
The above command will create a directory called chef-repo in the current location. This directory contains all the basic settings for interacting with chef server from workstation.
It also has a cookbook directory inside, where all cookbooks will be stored and later pushed to central chef server.
Let's get inside the "chef-repo" directory, and see what's inside.
root@workstation:/home/ubuntu/chef-repo# ls -la
total 32
drwxr-xr-x 5 root   root   4096 Jun 30 02:45 .
drwxr-xr-x 5 ubuntu ubuntu 4096 Jun 30 02:45 ..
drwxr-xr-x 4 root   root   4096 Jun 30 03:01 .chef
drwxr-xr-x 4 root   root   4096 Jun 30 02:59 cookbooks
-rw-r--r-- 1 root   root    495 Jun 30 02:30 .gitignore
-rw-r--r-- 1 root   root   2341 Jun 30 02:30 README.md
drwxr-xr-x 2 root   root   4096 Jun 30 02:30 roles
There is a directory called ".chef" as evident from the directory listing above. This .chef directory contains the private key for the user. Also this ".chef" directory contains knife configuration file called knife.rb.
root@workstation:/home/ubuntu/chef-repo/.chef# ls -l
total 16
-rw-r--r-- 1 root root  423 Jun 30 02:30 knife.rb
-rw-r--r-- 1 root root 1678 Jun 30 02:30 sarath.pem
Knife.rb file will be read by knife tool while interacting with central chef server from workstation. The contents of knife.rb file looks like the below.
root@workstation:/home/ubuntu/chef-repo/.chef# cat knife.rb
# See https://docs.getchef.com/config_rb_knife.html for more information on knife configuration options

current_dir = File.dirname(__FILE__)
log_level                :info
log_location             STDOUT
node_name                "sarath"
client_key               "#{current_dir}/sarath.pem"
chef_server_url          "https://chef.example.com/organizations/slashroot"
cookbook_path            ["#{current_dir}/../cookbooks"]
root@workstation:/home/ubuntu/chef-repo/.chef#
client_key: Specifies the path of the private key file associated with the user. This private key will be used to authenticate workstation against the chef server.
chef_server_url: This is the full URL of the chef server with the organization path(we did create an organization during our previous tutorial of installing chef server. Our organization's name is "slashroot")
cookbook_path: The absolute path where cookbooks will be stored on the workstation. This is because knife will be syncing cookbooks to server, it will also be downloading cookbooks, will be creating new cookbooks etc.
client_name: This is the user name associated with the organization. We created a user named "sarath" in our previous tutorial.
You can create a user and an organization on your central chef server using the below commands.
Creating User:
chef-server-ctl user-create sarath Sarath Pillai sarath@slashroot.in password --filename sarath.pem
Creating An Organization in Chef:
chef-server-ctl org-create example "Example, Inc." association_user sarath
Instead of downloading the chef starter kit(which includes everything required for the workstation, along with the user key)for setting up the workstation as we did just now. We can alternatively create chef repo ourselves as shown below.
- Install the chefdk package(as described earlier) on the workstation.
- Run the command "chef generate repo chef-repo"
- Then create .chef directory inside the repository created (cd chef-repo && mkdir .chef && cd .chef)
- Then create knife.rb and also copy private key of the user to the .chef directory (knife.rb should have the exact same content that we saw earlier..the private key can be found on the chef server where we created the user using the chef-server-ctl command above.)
The chef_server_url setting inside knife.rb uses dns name of central chef server. What this means is...You need to have proper dns resolution working on chef workstation as well. In other words, chef workstation should be able to reach chef server using the dns name mentioned in chef_server_url
If its non production environment, then simply adding an entry to /etc/hosts file would do. Else, i would recommend doing a proper dns entry for chef server name.
Once all the above mentioned items are configured and ready. Let's verify the connectivity between chef workstation and chef server. As mentioned earlier, knife is going to be our tool while interacting with central chef.
So let's execute the below command.
Please remember the fact that you should execute knife commands only after navigating to the chef-repo directory. This is because knife looks for a directory called .chef, which contains our knife.rb settings file.
root@workstation:/home/ubuntu/chef-repo# knife ssl fetch
WARNING: Certificates from chef.example.com will be fetched and placed in your trusted_cert
directory (/home/ubuntu/chef-repo/.chef/trusted_certs).

Knife has no means to verify these are the correct certificates. You should
verify the authenticity of these certificates after downloading.

Adding certificate for chef.example.com in /home/ubuntu/chef-repo/.chef/trusted_certs/chef_example_com.crt
The above command interacts with the chef server (by using the URL defined inside knife.rb file), and grabs the SSL certificates of the server. This SSL certificate is then stored inside a new directory called trusted_certs.
Once the SSL certificates are added to the trusted list of knife. You can then verify the connectivity to central chef server using the below command.
root@workstation:/home/ubuntu/chef-repo# knife ssl check
Connecting to host chef.example.com:443
Successfully verified certificates from `chef.example.com'
If things are correctly configured..You should be able to see the above output. Now knife can do all the operations on the chef server using the user we have created(which is defined inside knife.rb), and the organization associated with that user.
We can do things like bootstraping a node, creating and uploading cookbooks to central chef server etc.
How to Boostrap a node using chef workstation?
Bootstrapping a node is nothing but the job of installing and configuring chef agent on a server that needs to be automated via chef. Installing and configuring a node with chef agent which will then start pulling configuration from central chef server, is a single knife command away as shown below.
knife bootstrap 10.12.2.23 --ssh-user root --ssh-password 'password' --node-name node1.example.com
The above command connects to the server 10.12.2.23 (an example node which is automated in this case), and then downloads chef agent and configures it to connect to our central chef server.
You can alternatively use the below command to bootstrap, in case your node only supports key based authentication.
knife bootstrap 10.12.2.23 --ssh-user ubuntu --sudo --identity-file privatekey.pem --node-name node1.example.com
Replace privatekey.pem with the real private key file. And we are also using sudo so that commands executed while installing chef agent on that node will be prepend with sudo.
the node name that we gave in both the commands will add that name for the node on the chef server. Chef server will be able to identify this node with that name.
How to Create and Upload a cookbook to chef server from workstation?
The second operation that the chef workstation does is to create a cookbook which acts as the main basic block of configuration that will be applied on nodes.
You can create a skeleton cookbook by using the below command.
knife cookbook create test
Again..Please do not forget the fact that knife commands needs to from chef-repo directory(as it requires .chef directory, which has the knife.rb settings file)
You can then upload this cookbook that we just created to central chef server using the below command.
knife cookbook upload test
In the next tutorial in this series, we will be learning to write chef cookbooks in detail.
 Sarath Pillai
 Satish Tiwary
Add new comment