Puppet Tutorial: Getting Started With Puppet Manifests

If you want to access our complete puppet documentation you can do that any time by going to our documentation section from the menu. Puppet is very vast, and an efficient tool that is currently being used by many major players in the industry. Being that said, its very difficult to accommodate the whole documentation in a single post or even a couple of posts for that matter.
This is the 6th post in our puppet documentation series. We will try our level best to keep things simple(but not simpler![]() ). In our previous post(Configuring Puppet Agent) we authorized our puppet client(agent/node) by signing the SSL certificate from the master server. Now as our client is authorized from the master, lets add some initial configuration details (or call it Manifests in puppet) for our node(after all puppet is made to do that!).
). In our previous post(Configuring Puppet Agent) we authorized our puppet client(agent/node) by signing the SSL certificate from the master server. Now as our client is authorized from the master, lets add some initial configuration details (or call it Manifests in puppet) for our node(after all puppet is made to do that!).
Every node(or puppet client) has got its configuration details in puppet master, written in the native puppet language. This details(files,packages,configuration options) written in the language which puppet can understand is called as manifests. We will add some manifests for our node called "slashroot2".
Puppet Server: slashroot1.slashroot.in
Puppet Agent: slashroot2.slashroot.in
What are the Contents of A Puppet Manifest?
Puppet manifest consists of the following things.
- Files.(these are the files which can be directly deployed on your puppet clients, for example httpd.con,yum.conf etc)
- Resources.
- Templates. (these can be used to construct configuration files on the node.)
- Nodes.(You already know this. These are the client nodes definition)
- Resources
- Classes
Don't worry about the terms which i didn't explain in the above list. As i told you puppet is a very vast tool(Keep reading you will come to know![]() ) .
) .
Now lets begin making our first manifest for our client node slashroot2.
The first and foremost thing before beginning our manifest, is to configure our site.pp file on the puppet master, which is under /etc/puppet/manifest/. Although we did create the site.pp when we were configuring puppet master for the first time, the file was kept empty.
Now lets populate our site.pp file as shown below.
[root@slashroot1 manifests]# pwd
/etc/puppet/manifests
[root@slashroot1 manifests]# ls
site.pp
[root@slashroot1 manifests]# cat site.pp
import 'nodes.pp'

$puppetmaster = 'puppet.slashroot.in'
[root@slashroot1 manifests]#
As you can see from the above shown example, that am inside /etc/puppet/manifests directory on the machine slashroot1(which is our puppet master server), and i have a file called site.pp in there.And the file contains two lines.
import statement tells to import a file called nodes.pp. And then we have defined a variable called "puppetmaster" which can be used anywhere in our puppet manifest.
Some Important Things To keep In Mind:
- Puppet manifest have .pp extension.
- "Import" statement is used to load files when puppet is started(so in the above case, when puppet starts it will load nodes.pp file)
- for importing all files contained in a directory you can use import statement in another way like import 'clients/*'. This will import all .pp files inside that directory.
- Inorder to use a variable in a string, like the one defined in our site.pp file we need to put that string inside double quotes like this "this is an example $puppetmaster"
Although we have imported a file called nodes.pp in the above example, there is no file called nodes.pp in our manifest directory as of now. So lets create that file. Now this file contains the client definitions. Which means this file will hold host names of the clients, and what all needs to be applied to that host.
Note: Making agent definitions inside a file called nodes.pp is a convention followed. You can create file with any name and import that file name in site.pp file.(what matters is the content of the file)
[root@slashroot1 manifests]# pwd
/etc/puppet/manifests
[root@slashroot1 manifests]# ls
nodes.pp  site.pp
[root@slashroot1 manifests]# cat nodes.pp
node 'slashroot2.slashroot.in' {
include httpd
}
[root@slashroot1 manifests]#
In the above shown example we created a nodes.pp file inside our puppet master's manifest directory. And the content of the file defines a host (our agent) slashroot2.slashroot.in.
Some Important things to keep in Mind about our nodes.pp file
- A node is a client that will connect to the puppet master and fetch configuration
- A node can be defined in the nodes.pp file with by using the statement node.
- Nodes are defined by keeping them in single qoutes.
- FQDN (Fully qualified domain Name) is normally used while adding node defenition.
- The configuration to be applied for a node will start just after the first curley braces in the node defenition.
- You can either include a class, or a module inside node(again let me remind you! Don't worry! we will come to classes and modules later.)
- httpd in the include statement in our nodes.pp is a module(which we will create shortly)
- You can include multiple classes and modules in a node by using comma seperated list or one include statemet per line.
What is a module in Puppet?
Module in puppet is nothing but a collection of manifests,files,templates,classes etc. In other words, it is a portable manifest(which contains all the components of puppet).
You can make a module which will contain all the necessary things that are required to configure a complete package. For example you can make a module which will configure ftp for your servers, and include that module, with include directive in nodes.pp file for that host.
Now lets make our module called httpd(which we have included in our nodes.pp file)
Structure of a puppet module:
Each and every module in puppet must be constructed by keeping its structure in mind. A module must contain all the required files and directories.
An important file called init.pp must be there for every modules you define.
Modules are normally loaded automatically when puppet starts.
In order to load the modules automatically, the directories where modules are kept must be mentioned in the /etc/puppet/puppet.conf file. It is done in the following way.
Some important things to keep in mind about modules in puppet
- Each module must follow the puppet's module structure, with its files and directories
- init.pp file is necessary for a module.
- By default puppet will look for modules in /etc/puppet/modules and /var/lib/puppet/modules directories.
- You can add addition directories for puppet to look for modules with the help moduledir parameter in puppet.conf file under [main] section.
For example: moduledir = /opt/modules/: /modules/
Lets create our first module(httpd module which we included in our nodes.pp)
Step 1: the first step for creating a module is to create its required directories.
So we will create our module inside /etc/puppet/modules/ directory(where puppet bydefault looks for the modules).
[root@slashroot1 puppet]# pwd
/etc/puppet
[root@slashroot1 puppet]# mkdir -p modules/httpd/{files,templates,manifests}
[root@slashroot1 puppet]# ls
auth.conf        manifests  puppet.conf
fileserver.conf  modules    puppet.conf.rpmsave
[root@slashroot1 puppet]# touch modules/httpd/manifests/init.pp
[root@slashroot1 puppet]#
In the above example we created a directory called modules and also created directories named files,manifests,templates inside it.And we also created a file called init.pp inside manifests directory(which is very much necessary)
So the whole content of our module named httpd will be inside the directory /etc/puppet/modules/httpd/
Step 2: Now lets fill our init.pp file which we just created for our module named httpd.

As shown in the above figure we have created our init.pp file and populated it with some configuration options.
Lets understand those configuration options one by one.
The first thing we defined in the above shown init.pp file is a class called httpd.
An important thing to note here is that, there are two resources in that class. The first resource is called a package(which is httpd), the second resource is a file called slashroot.conf(Now you atleast might have got an idea of resources..There are much more resources to come..).
So our first resource "Package", says that the package named httpd must be present.
And the second resource says that there should be a file "/etc/httpd/conf.d/slashroot.conf" and the owner and group must be "apache", with the permission of "0440".
The second last line tells the location of the source file, from where clients will retrieve the file for deploying it in the location "/etc/httpd/conf.d/".
If you notice we have used the variable named $puppetmaster, which we defined in site.pp file earlier, inside the source directive(and also have used double quotes, because we are using variable inside that).
And yeah the main thing that we need to do now is to keep the required file in the exact location that we mentioned in our class.
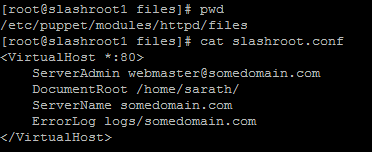
So as shown in the above figure i created a sample httpd configuration file called slashroot.conf.
The following things are done till now.
- Made a site.pp file with one variable and also imported nodes.pp file in it
- we made a nodes.pp file and included a module called httpd inside our slashroot2 node
- we made a module named httpd, with two resources (package and a file)
Now lets restart puppet master and run puppet agent on the client(slashroot2).
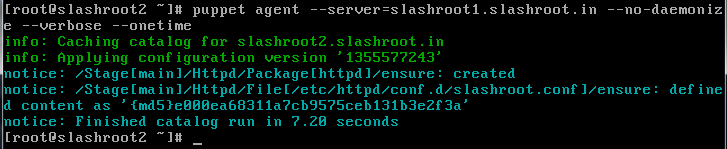
Wow did you see that???!! when i ran puppet agent on my client node(slashroot2) it did two things, which is clear from the notice message in the above screen shot.
- It installed httpd package on the client node slashroot2
- It created slashroot.conf under /etc/httpd/conf.d/
it also reported the md5sum of that file..That great..
 Sarath Pillai
 Satish Tiwary
Comments
error
I followed your steps, but i was unable to create the slashroot.conf file via source. I finally figured it out, you need to remove "files" from the URI.
source => "puppet://$puppetmaster/modules/httpd/files/slashroot.conf"
needs to be changed to
source => "puppet://$puppetmaster/modules/httpd/slashroot.conf"
took me about an hour to figure out what the heck was wrong.
thanks for the guide!
Nate
'm working with puppet and I
'm working with puppet and I'm a beginner too. I'm using centos for master and ubuntu for client. I installed master and agent on respective systems. When i 'm connecting both getting an error " puppet exiting failed to retrieve certificate and wait for cert is disabled " . please help me.
Puppet Wait For Cert is disabled Error
Hi Devaki,
There are two things to check here. The first thing is are you using the correct puppet master name on the client side, and is dns configured properly on both the server and the client(the server should be able to reach the client with the dns name you are using, and vice versa.)
The second thing to check is NTP. Sync both your server and the client to the same NTP server and then try again. (once you sync the NTP on both the server, remove the ssl certificate directory on both the server and the client. SSL certificate directory is located at /var/lib/puppet/ssl/). Now restart puppet master and the client. Then regenerate the certificate signing request on the client side by issuing the below command.
puppetd --verbose --waitforcert 60 --server <your puppet master name> --noop
Now you will see the certificate signing request on the server, sign it and it should work.
Let me know..
Regards
I'm very new to this subject
I'm very new to this subject . But i want to learn in depth. So can you please tell me how to configure DNS on both server and client?
On client side in /etc/hosts file i gave the IP address of puppet master. Is that correct?
Please help me in this.
DNS entry for puppet
Hi,
I believe you are trying this in your local LAN. In any case make entries in /etc/hosts file on both the server and the client. the server should contain both its own name address mapping. And the client should also contain its own as well as server's address/hostname mapping.
Example hosts file entry. Both the server and the client should have these, so both of them can reach each other by name.
172.16.200.1 puppetmaster.mydomain.com
172.16.200.2 puppetclient.mydomain.com
Now this is not required if you manage a dns server of your own in your LAN. Simply add the new puppetmaster and client host ip mapping on your dns server(in any case the /etc/hosts file entry will work)
Now sync your NTP to the same time source on both the client and the server, and then remove the ssl directory as mentioned previously, and then try again. Let me know.
Regards
Thanks a lot ... your article
Thanks a lot ... your article really helped me a lot...
how to copy a configuration file from puppet master to clients?
how to copy a configuration file from puppet master to clients? Can you please provide
the instructions that you are going to give in init.pp here?
Awaiting your reply.
Copying config files from puppet master to clients
Hi Harikrishnan,
You can use the puppet file resource inside your module. You can use file resource..Find the complete details here.https://docs.puppetlabs.com/references/latest/type.html#file
Also See step 2 in this article, the httpd configuration file is being served using puppet. Its actually quite simple..Let me know..
Thanks
Sarath
Error 400
I did exactly the same thing. But the client unable to retrive the file saying that "err0r 400 Invalid mount point.
I am putting content of config file and error below.
[root@kishor httpd]# cat manifests/init.pp
class httpd {
package { 'httpd':
ensure => present,
}
file { 'kunal.conf':
path => '/etc/httpd/conf.d/kunal.conf',
ensure => present,
owner => "apache",
group => "apache",
mode => 0440,
source => "puppet:///$puppetmaster/modules/httpd/files/kunal.conf"
}
}
[root@kishor httpd]# pwd
/etc/puppet/modules/httpd
[root@kishor httpd]#
On client.
Error: /Stage[main]/Httpd/File[/etc/httpd/conf.d/kunal.conf]: Could not evaluate: Could not retrieve file metadata for puppet:///puppet.kunal.com/modules/httpd/files/kunal.conf: Error 400 on SERVER: Cannot find file: Invalid mount 'puppet.kunal.com'
Notice: Finished catalog run in 0.35 seconds
[root@node1 ~]#
I am able to manage the package httpd which is going well. But problem in deploying the httpd conf file only.
I also define the file server at /etc/puppet/fileserver.conf
[mount_point]
path /etc/puppet/modules/httpd/files/kunal.conf
allow *
But no luck.I also try /etc/puppet/modules/httpd/files/ in the above config file.
Puppet Agent Error
Hi,
I did follow the stpe you had mentioned and i got the following error:
root@agent1:~# puppet agent --server puppetmaster --no-daemonize --verbose
notice: Starting Puppet client version 2.7.11
Could not run: Could not create PID file: /var/run/puppet/agennt.pid
Can you please help me out with it?
Thanks.
Could not run: Could not create PID file: /var/run/puppet/agennt
Kill the process id of current running puppet on the client.
Thanks
Hi,
This blog was really helpful to me to understand the Puppet manifests. Am eagerly waiting for your future blogs on puppet.Thanks a lot.
Loading Docker Image
Hi,
Is there any way to load docker image from .tar file using puppet open source. 'image.tar' was created by using 'docker save' in another machine.
thanks
thanks for this tutorial now i am cleared with the manifests concepts of puppet.
:)
Add new comment